2011年6月4日土曜日

リブートせずにWindows上でAndroidアプリが動かせるソフト「BlueStacks」が登場

BlueStack Systems社が、WindowsPCからAndroidアプリをシームレスに使える世界初のソフトウェア「BlueStacks for Windows」が発売予定であることを発表しました。

発表によれば「BlueStacks for Windowsによって、ビジネスの世界での必需品であるWindowsアプリケーション(Internet Explorer、 Excel、Outlook、PowerPoint、Word等)を使いながら、
Android のエンターテインメント系アプリケーション(ゲーム、音楽・動画、写真等)や日常生活に必要なアプリケーションを、一台のPCで同時に楽しめるようになる」とのことで、シーンによっては非常に便利なソフトとなるかもしれません。

というわけで、製品発表に関する詳細な資料は以下から。

BlueStacks
http://www.bluestacks.com/

BlueStacksのニュースリリースに記載された製品概要は以下の通りです。

◆製品概要
・Windows上で、AndroidとWindowsのアプリケーションを同時に動かせるソフトウエア

・Windowsが動くタブレットPC、スレートPC、Netbook、Notebook、Desktopに対応
・タッチパネルを使用することにより、携帯電話、スマートフォンと同様な操作性を実現
・通常のマウスでも使用可能(推奨はタッチパネル対応)
・対応Windows OS:Windows 7、Windows Embedded Standard 7、Windows XP SP3

マイクロソフト、タブレット版 Windows の開発パートナー数を制限したい意向

米マイクロソフトはタブレット用に開発されている次期 Windows に関し、チップメーカに「1 つのコンピュータメーカーのみと手を組む事」という制約を課していると報じられている (Bloomberg の記事) 。

マイクロソフトは「1 つのチップメーカーにつき 1 つのタブレットデザイン」という制限を設ける予定だそうで、タブレット用 Windows の計画に詳しい 3 人の関係者の話から明らかになった。この制限は強制されるものではないが、従った場合にはインセンティブが発生するものだという。マイコミジャーナルによれば他にも UI に関しても細かい制約が設けられているとのこと。

マイクロソフトとしては統一されていない様々な Windows タブレットが市場に出るのを避け、iPad に対抗していきたいというのが本音のようだ

2011年6月3日金曜日

Google AppEngine に Amazon-Auth-Proxy を

 Google AppEngine に Amazon-Auth-Proxy を設置したAdd Starpoppen

GAEとはなんぞやレベルの勉強に poppen さんが作った gaeo-amazon-auth-proxyを設置してみた。

以下、Proxyを広めるための簡単な手順。

gaeo-amazon-auth-proxy の準備

git clone git://github.com/poppen/gaeo-amazon-auth-proxy.git cd gaeo-amazon-auth-proxy svn co http://google-app-engine-oil.googlecode.com/svn/trunk/oildrum/gaeo/ mv rpaproxy.sample.yaml rpaproxy.yaml mv amazon-auth-proxy.sample.yaml amazon-auth-proxy.yaml

rpaproxy.yaml と amazon-auth-proxy.yaml をよしなに書き換える。この二つのファイルは基本的にAmazonやProxy側の設定なので、GAEな設定は関係ない。

Google AppEngine の準備

http://appengine.google.com/ にアクセスしてGAEのアカウントを作成する。Googleアカウントがない場合はGoogleアカウントから作成する。GAEアカウントの作成にはケータイ電話が必要で、Googleから送信されるパスコードを受信して入力しなければならない。

アカウント作成後にアプリケーションIDと名前を作成することになるので適当に入力。今回はIDが「hsbt-aap」で名前が「Amazon-Auth-Proxy for GAE」とかにした。

この後に有料プランを使うとかその辺の設定もあったりするんだけど、今回は Free プランで使えるリソースで運用するので特に設定は変更しない。

amazon-auth-proxy を GAE 上にデプロイする

デプロイ前に app.yaml の先頭にある application の部分を先に取得したGAEのアプリケーションIDに書き換える。

今回はデプロイに GoogleAppEngineLauncher.app を使った。ダウンロードはこちら →http://code.google.com/intl/ja/appengine/downloads.html

GoogleAppEngineLauncherを起動したら File > Add Existing Application を実行して最初に準備した gaeo-amazon-auth-proxy のフォルダを選択。

name の部分にGAEのアプリケーションIDが表示されているのを確認してから、Deploy を実行してGoogleアカウントの情報を入力するとDeployが行われる。アプリケーションの配置が心配な人は一度 Run をして localhost で動作チェックするといいかも。

グーグル、絵本「ブラウザやWebについて知っておきたい20のこと」日本語版を公開

 グーグルは3日、「HTML5」や「クラウド」など、最新のWebテクノロジーについて解説するWebブック「ブラウザやWebについて知っておきたい20のこと」の日本語版の提供を開始した。

 「ブラウザやWebについて知っておきたい20のこと」は、絵本のような体裁で、毎日使うブラウザやWebの基礎を解説したガイドブックとなっている。カワイらしいタッチのイラストを多用するとともに、イラストの一部が動くなどの仕掛けも用意されている。

 制作には、グーグルのChrome開発チームがHTML5を活用し、絵本のカバーの質感、実際にページをめくっている感覚などを表現したという。Chromeなど、HTML5に対応したブラウザで閲覧可能。オフラインでも動作する。

 なお、このWebブックの制作に使われた技術はオープンソースとしても公開されている。本物の絵本を開くときの重さのバランスや、パラパラとめくる感覚、便利なブックマーク、そして「夜にこっそり懐中電灯で絵本を読んでいるような気分にしてくれる」というライトオフモード機能などを利用してWebブックが制作可能だ。

GALAXY S/Tabを買ったらこれを入れよう!おすすめ定

Android端末は、自分でカスタマイズすることによって格段に使いやすくなります。まず最初に、GALAXY Tabのホーム画面の例を見てください。一番左が買った状態のホーム画面。真
ん中と右側が、私が普段使っている状態です。

Androidの大きな特徴と言える機能が、「ウィジェット」。ウィジェットとは、アプリの機能の一部を小窓で出しておけるもの。Androidアプリはウィジェットを備えているものが多く、ウィジェットを使うと常に更新された情報を表示できるのがポイントです。初期状態だとニュースと天気のウィジェットだけが表示されていますが、私はいつも、天気や時計、ニュース、facebookアプリなどの情報を、ウィジェットでホーム画面に表示しています。

 それではここから、私が実際に「GALAXY S SC-02B」(以下、GALAXY S)と「GALAXY
Tab SC-01C」(以下、GALAXY Tab)にインストールして普段使っている、オススメ定番アプリ10本を紹介しようと思います。

機能アップ、使いやすさアップのためのオススメアプリ

Automatic Task Killer


起動したままになっているアプリを強制的に終了する「Automatic Task Killer」。終了するしないはアプリごとに設定可能。GALAXY Sユーザーは入れておこう
 Androidでは複数のアプリを同時に動かすことができます。そして、ユーザーが明示的にアプリを終了しない限り、アプリは起動したまま、動き続けます。

 例えば、ブラウザでWebサイトを見ていたら、メールが届いた。そこに面白いものを見つけたので、カメラを起動して写真を撮った……という場合。カメラを使っている裏で、実はWebブラウザやメールアプリが動いたままなのです。各アプリはそれぞれ通信したり、動いたりしています。起動したままなのを忘れて放っておくとどうなるかというと、「そんなに使っていないはずなのに、もうバッテリーが残り少ない!」ということになるのです。

 そこで入れておくと便利なのが、アプリを自動的に終了してくれるツール。「タスクキラー」と呼ばれるもので、たくさんの種類があります。私が使っているのは「Automatic Task Killer」というアプリです。これを
入れておくとバッテリーのもちが格段に伸びるので、タスクキラーアプリは忘れずにインストールしておきましょう。


ATOK Trial


文字入力アプリを変えると、使い勝手が大きく変わるのがAndroidの面白さ。左は「ATOK
Trial」のフラワータッチ、右はGALAXY S/Tabに最初から入っている「Samsung日本語キーボード」
 iPhoneにはないAndroidの大きな特徴の一つが「キーボード(文字入力)を自分で選べる」こと。

 Androidの場合、「OpenWnn」「Simeji」「ATOK」あたりが定番でしょうか。私はPCと同じくATOKを愛用しています。現在Android用ATOKは試用版「ATOK Trial」のみですが6月22日に正式版が発売される予定
です。

 キーボードについては「どれがいい」ということはなく、完全に好みの世界。文字入力は、スマートフォン操作の基本の中の基本。最初から使えるSamusungの入力ツールも必要十分ですが、ぜひほかのキーボードも試してみてください。文字入力方法を変えると、使い勝手がかなり変わりますのでお試しあれ。


履歴消しゴム


Androidはあらゆる検索履歴をずらりと表示するので、ときどき自分でも気恥ずかしくなる(左)。さまざまな検索履歴や発着信履歴など、いろいろな履歴を消してくれる「履歴消しゴム」(右)
 Googleが作ったOSだけあって、Androidではしょっちゅう検索機能を使います。気になる言葉を検索したり、地図で地名を検索したり、Androidマーケットでアプリを検索したり……。

 使っているうちにだんだん気になってくるのが「入力履歴」。検索窓に文字を入れようとすると、過去に入力した履歴がずらっと表示されるのです。ある意味「さすがGoogle」ですし、おかげで同じ言葉を検索するときなどは非常に便利なのですが、人に見せるときなど、ちょっと気恥ずかしいのも事実。誤入力も残っていますし。

 「履歴消しゴム」は、Google検索やAndroidマーケット、YouTubeなどに入力した検索履歴を見えないように消してくれるアプリです。このほか、発着信履歴やよく使う連絡先、送受信したSMS/MMSなども消去できます。入れておくと地味に役立つアプリです。


仕事力向上ツール

Dropbox


PCにDropboxのフォルダを作っておくと(左)、Android端末からフォルダにそのままアクセスできる(右)。GALAXY S/Tabの場合、WordやExcel、PowerPointなどのファイルを閲覧・編
集できるアプリが最初からインストールされているのでさらに便利
 スマートフォンを仕事にも使いたいなら、絶対にインストールしたいのが「Dropbox」。前回の記事でも紹介しましたが、PCの中にあるファイルに、GALAXY S/Tabからシームレスにアクセスできます。

 AndroidでもiPhoneでもiPadでも、Windows PCもMacでも、どこからでもファイルにアクセスでき、自動的に同期をとって最後に編集した最新状態を保持してくれるのがDropboxの便利なところ。更新履歴が保存されているので、「うっかり消しちゃった」といった場合でも、さかのぼって以前の状態にフォルダやファイルを戻せるのがありがたい。

 GALAXY S/Tabにプリインストールされている「Evernote」と合わせて、PCを複数台使っていたり、スマートフォンを使っている人には間違いなく便利なサービスです。

KUNAI Lite(サイボウズ)


サイボウズ Officeのクライアントアプリ「KUNAI Lite」。予定の確認、書き込みがすばやくできる
 「サイボウズ Office」などのグループウェアをオンラインスケジューラを使っている人なら、スマートフォンで予定を見られるようにしておくとすごく便利です。

 Webブラウザから確認してもいいのですが、専用アプリがあればインストールしておくとさらに便利に。いつでもどこでもスケジュールを確認、変更できます。私の場合、会社がスケジューラとしてサイボウズ Office8を導入して
いるので、クライアントアプリ「KUNAI Lite」は最初に必ずインストールするアプリの1つ。自分が使っているオンラインカレンダーやスケジューラがAndroidアプリを出していないか、確認してみるといいと思います。


やっぱり地震が心配、という人に

なまず速報


「なまず速報」をインストールすると、緊急地震速報のプッシュ通知を受けられる(左)ほか、最近の地震速報を閲覧できる。赤いポイントは直近30回の地震の震源地を地図で表示したもの(右)
 3月11日の東日本大震災以来、日本の各地で余震が続いています。最近の携帯電話は「緊急地震速報」が受信できるものが多いですが、Androidスマートフォンでこれに相当する機能を実現するアプリが「なまず速報β」。

 メインの機能は、最近の地震情報を一覧表示で確認できるというもの。震源地や震源の深さ、マグニチュードなどを確認できます。これに加えて、気象庁が発している緊急地震速報をプッシュ通知できるのがこのアプリのポイント。まだまだ余震が続く東日本。GALAXY S/Tabは緊急地震速報には対応していないので、このアプリを入れておくと
安心です。


写真系アプリ

JustPictures!


GALAXY S/Tabで撮った写真も、PicasaやFlickr、Facebook、Tumblrなどにアップした写真も同じように見られる「JustPictures!」。動きも軽快
 デジカメで撮った写真、どうやって管理していますか? 複数のPCやスマートフォン、タブレットなどからアクセスしたい、という場合は、オンライン画像共有サービスにアップロードしておくのが便利です。Googleの提供する「Picasa」や米Yahoo!の「Flickr」には大量の写真を置いておくことができます。

 GALAXY S/Tabの端末内に入っている写真も、オンラインのサーバ上に置いてある写真も、同じように扱えるアプリが「JustPictures!」。上述のPicasaやFlickrのほか、FacebookやTumblrにアップしてある写真も、端末内にある写真と同じように扱えます。あちこちに写真をアップロードしている人にはとても便利なアプリです。


BeFunky


トイカメラ風のエフェクトが20種類以上用意されている。エフェクトをかけるとどうなるか、画面下のサムネイルでプレビューしてくれるのも便利(左)。写真をトリミングしてフレームを付ける機能も楽しくてお気に入り。フィルム風、ポラロイド風の写真が簡単に作れる(右上、右下)
 以前iPhoneを使っていたとき、一番楽しかったのが写真系のアプリがたくさんあったことでした。特に、撮った写真をトイカメラ風に加工してアップロードできるのは、普通のケータイカメラにはできないこと。ポラロイド風やトイカメラ風の写真を作ってはあちこちにアップロードしていました。

 Android端末を使い始めてからもカメラアプリは好きでいろいろ試したのですが、iPhoneアプリに比べるとバリエーションが乏しかったり、いまいち機能が充実していなかったり……と残念に思っていました。これまで使っていた「FX Camera」
「Retro Camera」なども気に入っているのですが、最近見つけた「BeFunky」は機能充実、やりたいことが一通りできる多機能アプリです。

 トイカメラ風に写真を加工することもできますし、正方形に写真をトリミングしてフレームをつけ、ポラロイド風に仕上げることも。簡単な補正機能もついているので、このアプリを1つ入れておけば、やりたいことは大体できるはず。携帯でよく写真を撮るという方にオススメです。


アプリを探すためのアプリ

FriendApp


ほかの人がおすすめしているアプリや、友達がインストールしたアプリを知ることができる(左)。自分がインストールしたアプリには、星を付けたりひとことレビューを書いたりして、周りに伝えよう(右)
 Androidには数え切れないほどのアプリがありますが、それだけに自分の目的に合ったアプリにめぐりあうのは大変。アプリを探そうとAndroid Marketにアクセスして、たくさんのアプリを見るうち
に目移りしてしまい、結局最初の目的を達せられなかった……という経験があるのはきっと私だけではないと思います。

 「友達はどんなアプリを使ってるんだろう」「ほかの人はどんなアプリをオススメしてるの?」——そんな疑問に答えてくれるアプリが「FriendApp」です。

 FriendAppを使うと、ほかのAndroidユーザーがおすすめしているアプリや最近使い始めたアプリ、レビューを書いたアプリなどをチェックできます。教わるだけでなく、人に伝えることも。もしお気に入りのアプリにめぐり会えたら、「シェア」したり、星を付けたりして、ほかのFriendAppユーザーに教えてあげましょう。


Twitterクライアント

Twicca


Twitterクライアントは機能もデザインもいろいろ。私は「Twicca」をメインで使っています
 スマートフォンで何をしているかは人それぞれですが、「スマートフォンで何してる時間が長い?」と聞くと「結局、Twitterを見てる」と答える人は多いです。私の場合もほとんどゲームをしないので、スキマ時間に一番眺めている時間が長いのは、やっぱりTwitterです。ケータイでもTwitterを楽しめるサービスは増えているのですが、指先でタイムラインをサクサクとスクロールして、大量のツイートを流すように読むのは、やはりスマートフォンが得意とする使い方。ツイート内にURLが書かれている場合も、スマートフォンならすぐに見ることができます。

 PCやiPhoneと同じく、Android用にもさまざまなTwitterクライアントがあります。Twitter公式のAndroidアプリや「TweetDeck」「Seesmic」「HootSuite」など人気クライアントはたくさんありますが、私がメインで使っているのは「twicca」。シンプルな画面デザイン、片手での操作のしやすさ、動作がキビキビしている点などが特徴。Android用Twitterクライアントとしては老舗なので、twiccaと一緒に使うアプリがいろいろあるのも魅力です。

 なお、Twitterのほかにも、Android端末から利用できるコミュニケーションサービスはいろいろあります。スマートフォンの定番ともいうべき「Facebook」「Foursquare」はいずれもAndroid用アプリがあります。「mixi」「ロケタッチ」といった国産サービスもAndroid用アプリを提供しているので、探してみてください。


おまけ

Biz誠


Business Media 誠、誠 Biz.ID、誠 Style、誠ブログをまとめて読める「Biz誠」(左)。面白い記事があったら、URLと記事タイトルをTwitterなど他アプリに送れる機能も(右)
 最後にもう1本、おまけで紹介させてください。「Biz誠 for Android」は、Business
Media 誠、誠 Biz.ID、誠 Styleのほとんどすべての記事と、誠ブログのブログエントリをAndroid端末で読めるアプリ。アプリを起動する時に最新25本×4ジャンルの記事を取得し、一度読み込んでしまえば、地下鉄など電波が届かないところでもサクサク記事が読めるのがメリットです。

 面白い記事があったら、そのタイトルやURLにコメントを付けてTwitterに投稿できる機能も。いささか手前味噌ですが、電車の中などで本を読むように、たっぷりとテキストが読める「Biz誠」。移動時間が長い人には特にオススメです。


 何かと比べられることが多いiPhoneとAndroidですが、両者のUIには大きな違いがあります。両方を使ってみて私が思うのは「iPhoneは初心者にも最初からかなり使いやすいが、ユーザーは基本的に決められた使い方以外をすることができない。Androidは一見取っつきにくい半面、カスタマイズすればするほど快適になる。ウィジェットを入れたり、アプリ同士を連携することでいろいろな部分をカスタマイズし、自分の使いやすいように仕立てていける」という違い。

 GALAXY S/Tabには最初から、便利なアプリがプリイインストールされていますが、自分でアプリを追加してさらにカスタマイズすることで、もっと使いやすくなっていくのです。本記事では、Androidスマートフォンを買ったら最初に入れたい、定番(と私が思っている)アプリを中心に紹介しました。

 開発者が自由にアプリを配布できるAndroidの世界では、日々ものすごい数のアプリが公開されています。便利なアプリ、面白いアプリは紹介しきれないくらいたくさんあります。あくまでこれは私の例。いろいろなアプリを試して、GALAXY S/Tab
をもっと使いやすくあなた好みに育ててあげてください!

GALAXY S/Tabの隠れた便利機能
 この記事で紹介している画像のようにAndroidスマートフォンで画面写真を撮るには、通常、PCにAndroid SDKという開発者用のツールをインストールし、Android端末をPCにUSBで接
続してPCから画面をキャプチャすることになります。これはとても面倒。
 しかしGALAXY S/Tabは、PCがなくても、本体だけで画面をキャプチャすることができます。やり方は簡単で「[戻る]ボタンを押しながら[ホーム]ボタンを押す」だけ。
 さらに簡単・確実にするには「スクリーンキャプチャーショートカット」というアプリを使います(100円)。これをインストールすれば、端末を左右に振るだけで画面キャプチャが可能になります。よく画面キャプチャをとる人は、ぜひ試してみてください。

Androidアプリに認証をかけて起動をロック

Androidアプリに認証をかけ、第三者による起動を防ぐ——。CGENEが「シークレットアプリロックPro」の配信を開始した。認証方式は文字入力や位置情報など、14種から選べる。

 シークレットアプリロックProは、電話帳やメールなどプライベートな情報を含むアプリに個別に認証をかけられるアプリ。アプリに認証を設定することで、第三者が勝手にアプリを起動するのを防ぐことができる。認証は、「文字入力認証」「位置情報認証」「ポイントタッチ認証」「ジェスチャー認証」「リバーシ認証」などの14種類をアプリごとに指定でき、複数の認証を組み合わせることも可能。また、「WebAPI認証」と組み合わせれば、ユーザーごとのアプリの起動可否も設定できる。

 対応OSはAndroid 2.1以降。対応機種は、Xperia arc、MEDIAS、Optimus、GALAPAGOS、HTC EVO、IS05、REGZA、LYNX 3D、Galaxy Tab、Galaxy S、LYNX、Xperia、HTC
Desire、Libero、AQUOS、SIRIUSα IS06、Nexus S、Nexus One、Motorola XOOM。

 なお、起動ロックをかけるアプリの数に制限がある無料版「シークレットアプリロック[体験版]」も提供中だ。

Windows Phone 7 Mango搭載のスマートフォン「Acer W4」

 今回のCOMPUTEX TAIPEIに合わせて発表された、台湾Acerのスマートフォン「Acer
W4」。OSとしてWindows Phone 7の次期アップデート版となるMangoを搭載し、今年11月の販売開始を予定している。

 COMPUTEX会場にて「Acer W4」が展示されたのは、MicrosoftとAcerのブース。前者では、台湾HTCの「HTC 7 Trophy」や「HTC 7 Mozart」、韓国LGのLG Optimus 7」など、現行の
Windows Phone 7搭載機種も展示され、多くの来訪者がタッチ&トライを行なっていた。一方、「Acer W4」は、わずかに離れた場所でのショーケース展示。スタッフによると「今
回はモック展示」とのことだった。

 Acerのブースでは、同社による他のスマーフォンと同列で展示され、本体のタッチまでは可能。だが、電源が入らず、こちらもモックの展示にとどまった。

 今回発表された「Acer W4」のスペックは以下の通り。ディスプレイは3.6型WVGA
Capacitive。チップセットはQualcomm QSD8255(1GHz)。メモリは8GB eMMC。外部メモリは非対応。カメラは500万画素(オートフォーカス)。

 対応ネットワークはHSPA+/GPRS/EDGE/GSM。WLANは802.11b/g/n。Bluetoothは2.1EDR。GPSはGPS/AGPS。バッテリは1300mAh。サイズは幅約59×高さ約115.8×厚み約59mm

2011年6月2日木曜日

Using SQLite Database with Android

Android default Database engine is Lite. SQLite is a lightweight transactional database engine that occupies a small amount of disk storage and memory, so it's a perfect choice for creating databases on many mobile operating systems such as Android, iOS.
Things to consider when dealing with SQLite:
  1. Data type integrity is not maintained in SQLite, you can put a value of a certain data type in a column of another datatype (put string in an integer and vice versa).
  2. Referential integrity is not maintained in SQLite, there is no FOREIGN KEY constraints or JOIN statements.
  3. SQLite Full Unicode support is optional and not installed by default.
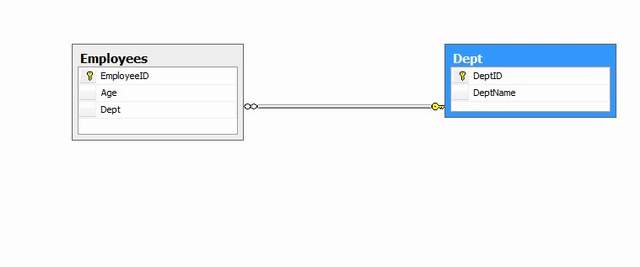
In this tutorial, we will create a simple database application to store employees data. the DB has:
Tables
  1. Employees
  2. Dept
Views
  1. ViewEmps: to display employees and their relative departments.
Creating SQLite Database
By default, SQLite on Android does not have a management interface or an application to create and manage databases from, so we're going to create the database ourselves by code. First, we will create a class that handles all the operations required to deal with the database such as creating the database, creating tables, inserting and deleting records and so on. The first step is to create a class that inherits from SQLiteOpenHelper class. This class provides two methods to override to deal with the database:
  1. onCreate(SQLiteDatabase db): invoked when the database is created, this is where we can create tables and columns to them, create views or triggers.
  2. onUpgrade(SQLiteDatabse db, int oldVersion, int newVersion): invoked when we make a modification to the database such as altering, dropping , creating new tables.
Our class will have the following members:
Collapse
public class DatabaseHelper extends SQLiteOpenHelper {
 
static final String dbName="demoDB";
static final String employeeTable="Employees";
static final String colID="EmployeeID";
static final String colName="EmployeeName";
static final String colAge="Age";
static final String colDept="Dept";
 
static final String deptTable="Dept";
static final String colDeptID="DeptID";
static final String colDeptName="DeptName";
 
static final String viewEmps="ViewEmps";
The Constructor
Collapse
public DatabaseHelper(Context context) {
  super(context, dbName, null,33);
  }
The constructor of the super class has the following parameters:
  • Context con: The context attached to the database
  • dataBaseName: The name of the database
  • CursorFactory: Sometimes, we may use a class that extends the Cursor class to implement some extra validations or operations on the queries run on the database. In this case, we pass an instance of CursorFactory to return a reference to our derived class to be used instead of the default cursor. In this example, we are going to use the standard Cursor Interface to retrieve results, so the CursorFactory parameter is going to be null.
  • Version: the version of the schema of the database. The constructor creates a new blank database with the specified name and version.
Creating the Database
The first superclass method to override is onCreate(SQLiteDatabase db):
Collapse
public void onCreate(SQLiteDatabase db) {
  // TODO Auto-generated method stub
 
  db.execSQL("CREATE TABLE "+deptTable+" ("+colDeptID+ " INTEGER PRIMARY KEY , "+
    colDeptName+ " TEXT)");
 
  db.execSQL("CREATE TABLE "+employeeTable+"
    ("+colID+" INTEGER PRIMARY KEY AUTOINCREMENT, "+
        colName+" TEXT, "+colAge+" Integer, "+colDept+"
    INTEGER NOT NULL ,FOREIGN KEY ("+colDept+") REFERENCES
    "+deptTable+" ("+colDeptID+"));");
 
 
  db.execSQL("CREATE TRIGGER fk_empdept_deptid " +
    " BEFORE INSERT "+
    " ON "+employeeTable+
 
    " FOR EACH ROW BEGIN"+
    " SELECT CASE WHEN ((SELECT "+colDeptID+" FROM "+deptTable+"
    WHERE "+colDeptID+"=new."+colDept+" ) IS NULL)"+
    " THEN RAISE (ABORT,'Foreign Key Violation') END;"+
    "  END;");
 
  db.execSQL("CREATE VIEW "+viewEmps+
    " AS SELECT "+employeeTable+"."+colID+" AS _id,"+
    " "+employeeTable+"."+colName+","+
    " "+employeeTable+"."+colAge+","+
    " "+deptTable+"."+colDeptName+""+
    " FROM "+employeeTable+" JOIN "+deptTable+
    " ON "+employeeTable+"."+colDept+" ="+deptTable+"."+colDeptID
    );
  //Inserts pre-defined departments
  InsertDepts(db); 
}
The method creates tables with columns, a view and a trigger. The method is invoked when the database is created. So we create our table and specify the columns. This method is invoked when the database does not exist on the disk, it's executed only once on the same device the first time the application is run on the device.
Upgrading the Database
Sometimes, we want to upgrade the database by changing the schema, add new tables or change column data types. This is done by overriding the onUpdate(SQLiteDatabase db,int old Version,int newVerison) method:
Collapse
public void onUpgrade(SQLiteDatabase db, int oldVersion, int newVersion) {
  // TODO Auto-generated method stub
 
  db.execSQL("DROP TABLE IF EXISTS "+employeeTable);
  db.execSQL("DROP TABLE IF EXISTS "+deptTable);
 
  db.execSQL("DROP TRIGGER IF EXISTS dept_id_trigger");
  db.execSQL("DROP TRIGGER IF EXISTS dept_id_trigger22");
  db.execSQL("DROP TRIGGER IF EXISTS fk_empdept_deptid");
  db.execSQL("DROP VIEW IF EXISTS "+viewEmps);
  onCreate(db);
}
This method is invoked when the version number specified in the constructor of the class changes.
When you want to append a change to your database, you must change the version number in the constructor of the class.
So when you pass the constructor a version number of 2:
Collapse
public DatabaseHelper(Context context) {
  super(context, dbName, null,2);
 
  // TODO Auto-generated constructor stub
}
instead of 1:
Collapse
super(context, dbName, null,2);
the application understands that you want to upgrade the database and onUpgrade method will be invoked. A typical implementation of this method is to drop the tables and create them again with the additional modifications.
Managing Foreign-Key Constraints
We mentioned before that SQLite 3 by default does not support foreign key constraint, however we can force such a constraint using TRIGGERS: we will create a trigger that ensures that when a new Employee is inserted, his/her Dept value is present in the original Dept table. The SQL statement to create such a trigger would be like this:
Collapse
CREATE TRIGGER fk_empdept_deptid Before INSERT ON Employees
FOR EACH ROW BEGIN
    SELECT CASE WHEN ((SELECT DeptID FROM Dept WHERE DeptID =new.Dept ) IS NULL)
    THEN RAISE (ABORT,'Foreign Key Violation') END;
    END
In onCreate method, we created this trigger like this:
Collapse
db.execSQL("CREATE TRIGGER fk_empdept_deptid " +
    " BEFORE INSERT "+
    " ON "+employeeTable+
 
    " FOR EACH ROW BEGIN"+
    " SELECT CASE WHEN ((SELECT "+colDeptID+" FROM "+deptTable+" _
    WHERE "+colDeptID+"=new."+colDept+" ) IS NULL)"+
    " THEN RAISE (ABORT,'Foreign Key Violation') END;"+
    "  END;");
Executing SQL Statements
Now let's begin executing basic SQL statements. You can execute any SQL statement that is not a query whether it is insert, delete, update or anything using db.execSQL(String statement) method like when we did when creating the database tables:
Collapse
db.execSQL("CREATE TABLE "+deptTable+" ("+colDeptID+ " INTEGER PRIMARY KEY , "+
    colDeptName+ " TEXT)");
Inserting Records
We insert records to the database using the following code for example to insert records in the Dept table:
Collapse
SQLiteDatabase db=this.getWritableDatabase();
ContentValues cv=new ContentValues();
   cv.put(colDeptID, 1);
   cv.put(colDeptName, "Sales");
   db.insert(deptTable, colDeptID, cv);
 
   cv.put(colDeptID, 2);
   cv.put(colDeptName, "IT");
   db.insert(deptTable, colDeptID, cv);
                     db.close();
Notice that we need to call this.getWritableDatabase() to open the connection with the database for reading/writing. The ContentValues.put has two parameters: Column Name and the value to be inserted. Also, it is a good practice to close the database after executing statements.
Updating Values
To execute an update statement, we have two ways:
  1. To execute db.execSQL
  2. To execute db.update method:
Collapse
public int UpdateEmp(Employee emp)
  {
   SQLiteDatabase db=this.getWritableDatabase();
   ContentValues cv=new ContentValues();
   cv.put(colName, emp.getName());
   cv.put(colAge, emp.getAge());
   cv.put(colDept, emp.getDept());
   return db.update(employeeTable, cv, colID+"=?",
    new String []{String.valueOf(emp.getID())});  
  }
The update method has the following parameters:
  1. String Table: The table to update a value in
  2. ContentValues cv: The content values object that has the new values
  3. String where clause: The WHERE clause to specify which record to update
  4. String[] args: The arguments of the WHERE clause
Deleting Rows
As in update to execute a delete statement, we have two ways:
  1. To execute db.execSQL
  2. To execute db.delete method:
Collapse
public void DeleteEmp(Employee emp)
  {
   SQLiteDatabase db=this.getWritableDatabase();
   db.delete(employeeTable,colID+"=?", new String [] {String.valueOf(emp.getID())});
   db.close();
  }
The delete method has the same parameters as the update method.
Executing Queries
To execute queries, there are two methods:
  1. Execute db.rawQuery method
  2. Execute db.query method
To execute a raw query to retrieve all departments:
Collapse
Cursor getAllDepts()
  {
   SQLiteDatabase db=this.getReadableDatabase();
   Cursor cur=db.rawQuery("SELECT "+colDeptID+" as _id,
        "+colDeptName+" from "+deptTable,new String [] {});
 
   return cur;
  }
The rawQuery method has two parameters:
  1. String query: The select statement
  2. String[] selection args: The arguments if a WHERE clause is included in the select statement
Notes
  1. The result of a query is returned in Cursor object.
  2. In a select statement if the primary key column (the id column) of the table has a name other than _id, then you have to use an alias in the form SELECT [Column Name] as _id cause the Cursor object always expects that the primary key column has the name _id or it will throw an exception .
Another way to perform a query is to use a db.query method. A query to select all employees in a certain department from a view would be like this:
Collapse
public Cursor getEmpByDept(String Dept)
  {
   SQLiteDatabase db=this.getReadableDatabase();
   String [] columns=new String[]{"_id",colName,colAge,colDeptName};
   Cursor c=db.query(viewEmps, columns, colDeptName+"=?",
        new String[]{Dept}, null, null, null);
   return c;
  }
The db.query has the following parameters:
  1. String Table Name: The name of the table to run the query against
  2. String [ ] columns: The projection of the query, i.e., the columns to retrieve
  3. String WHERE clause: where clause, if none pass null
  4. String [ ] selection args: The parameters of the WHERE clause
  5. String Group by: A string specifying group by clause
  6. String Having: A string specifying HAVING clause
  7. String Order By by: A string Order By by clause
Managing Cursors
Result sets of queries are returned in Cursor objects. There are some common methods that you will use with cursors:
  1. boolean moveToNext(): moves the cursor by one record in the result set, returns false if moved past the last row in the result set.
  2. boolean moveToFirst(): moves the cursor to the first row in the result set, returns false if the result set is empty.
  3. boolean moveToPosition(int position): moves the cursor to a certain row index within the boolean result set, returns false if the position is un-reachable
  4. boolean moveToPrevious(): moves the cursor to the previous row in the result set, returns false if the cursor is past the first row.
  5. boolean moveToLast(): moves the cursor to the lase row in the result set, returns false if the result set is empty.
There are also some useful methods to check the position of a cursor: boolean isAfterLast(), isBeforeFirst, isFirst, isLast and isNull(columnIndex). Also if you have a result set of only one row and you need to retrieve values of certain columns, you can do it like this:
Collapse
public int GetDeptID(String Dept)
  {
   SQLiteDatabase db=this.getReadableDatabase();
   Cursor c=db.query(deptTable, new String[]{colDeptID+" as _id",colDeptName},
        colDeptName+"=?", new String[]{Dept}, null, null, null);
   //Cursor c=db.rawQuery("SELECT "+colDeptID+" as _id FROM "+deptTable+"
   //WHERE "+colDeptName+"=?", new String []{Dept});
   c.moveToFirst();
   return c.getInt(c.getColumnIndex("_id")); 
  }
We have Cursor.getColumnIndex(String ColumnName) to get the index of a column. Then to get the value of a certain column, we have Cursor.getInt(int ColumnIndex) method.
Also there are getShort, getString, getDouble, getBlob to return the value as a byte array. It's a good practice to close() the cursor after using it.


SSL Verification for Android Applications

When we try to access a Web Service hosted on HTTPS and is secured over SSL, Host Verification and/or Peer Verification are to be handled in our application.
Background

Android supports the java.net and org.apache packages to access Web Services. I use Apache packages as I find them more useful and easier than using Java packages.
System Requirements

* Bouncy Castle

To Start

Host and Peer Verification are shown here. Each Android application has its own trusted store called KeyStore. In the KeyStore, we can store our self-signed SSL certificates that will be used for the verification purposes of our Web Service. Android trusts a couple of Trust Certificates, but if our signed certificate is not signed among those, then we need to add our certificate to the trusted store of the application.

Assuming you already have a self-signed certificate (if not, kindly use the key tool of Java to create one), let's add the certificate to a keystore using Bouncy Castle that we can access in our application. Like keytool is used in Java to create certificates, Bouncy Castle is the only way to add certificates to the Android keystore.
1. Creating the KeyStore

Download and unzip Bouncy Castle in a proper location and add the .jar file to the class path. Open cmd, go to the application folder, and type the following command:
Collapse

keytool -import -v -trustcacerts -alias 0 -file mycertificate.crt
-keystore res/raw/mystore.bks -storetype BKS -provider
org.bouncycastle.jce.provider.BouncyCastleProvider -storepass mypassword

* file parameter points to your certificate file that you want to add
* keystore => gives the store name that you want to give
* storepass => password to access the keystore

On successful execution of the command, the mystore.bks file will be generated successfully.
2. Create a Class to Use Our Store for HTTPS Connections

To use the store that we created above, we have to create a custom Apache DefaultHttpClient that knows to use the store for HTTPS requests.
Collapse

public class MyHttpClient extends DefaultHttpClient {

final Context context;
public MyHttpClient(Context context) {
this.context = context;
}

@Override
protected ClientConnectionManager createClientConnectionManager {
SchemeRegistry registry = new SchemeRegistry();
registry.register("http", PlainSocketFactory.getSocketFactory(), 80));
registry.register("https", newSslSocketFactory(), 443));
return new SingleClientConnManager(getParams(), registry);
}

private SSLSocketFactory newSslSocketFactory() {
try {
KeyStore trusted = KeyStore.getInstance("BKS");
InputStream in = context.getResources().openRawResource(R.raw.mystore);
try {
trusted.load(in, "mypassword".toCharArray());
}
finally {
in.close();
}

SSLSocketFactory mySslFact = new SslFactory(trusted);
//mySslFact.setHostNameVerifier(new MyHstNameVerifier());
return mySslFact;
} catch(Exception e) {
throw new AssertionError(e);
}
}
}

This code helps us to accept a server certificate and sets the certificate for verification. You can see how we are using our -storename parameter "BKS" to get the instance of the KeyStore, loading the certificate file mystore from R.raw, and setting its password that was used while adding it to the store.
3. Copy mystore File

Import the generated mystore.bks file to the res/raw folder. So our above class can access it from there.

With this, SSL Peer Verification is taken care of. We just have to create an instance of MyHttpClient in place of DefaultHttpClient and Peer Verification will be handled by itself.
4. Process for Host Verification

Android supports only the host/domain via which the web service is being called - if any other host is tried to connect it throws exception. For example, if our application connects to a host, and then tries to connect another host for any reason, Android won't allow to do that. For this to be allowed, we got to set the hostnames that we want to allow the application to access.
Collapse

public class MyHostVerifier extends org.apache.http.conn.ssl.AbstractVerifier {

String[] allowHost = {"my.ultra.com", "your.ultra.com", "ours.ultra.com"};

@Override

public void verify(String host, String[] cns,
String[] subjectAlts) throws SSLException {
// If the host is any the hosts to be allowed, return, else throw exception
for (int i=0; i < allowHost.length; i++) {
if (host == allowHost[i])
return;
}
throw SSLException;
}
}

Uncomment setHostVerifier in the MyHttpClient class and our class is ready to handle SSL Host Verification as well.

Toast: A User Notification

A Toast is a pop-up message, which allows you to quickly notify the user of some event. E.g. saving settings to an SD Card.

Toast's distinctive feature is the ability of the user to interact with either the Activity behind it or the Home Screen, while the message is still displayed. It is also noteworthy that the user can't dismiss a Toast using hardware "Back" key or other methods. A message smoothly fades in and then smoothly fades out. The duration between these fades can be set programmatically. In most cases, Toast is just a short message, but you can also create a custom view for it. For example, an image next to the text. Toast's position on the screen can be controlled as well. Toast can be created from either Activity or Service. If a Toast is created from Service, it is displayed in front of the Activity, which now has the focus, or on top of the Home Screen.
Creating a Standard Toast

A standard Toast can be created by calling a static makeText method of a Toast class.

Toast.makeText(getApplicationContext(), "Hello, The Code Project!",
Toast.LENGTH_SHORT).show();

Application context, the message itself and the duration of the Toast are passed as parameters. You can set the message text as either text or as a resource storing a string to be displayed. In our case, R.string.hello_codeproject resource contains the "Hello, The Code Project!" string. The duration can be either short - LENGTH_SHORT or long - LENGTH_LONG. By default, the duration is set to short. You can programmatically set the duration by calling the setDuration method.

The logic behind makeText method is pretty easy: a Toast object is created and then message text and duration are set. After that, you can either call show method to display the newly created Toast, or set some additional properties, like its position on the screen or a custom view for a Toast.
You can set the position of a Toast on the screen by a call to setGravity method:

Toast toast = Toast.makeText(getApplicationContext(),
"Hello, The Code Project!", Toast.LENGTH_LONG);
toast.setGravity(Gravity.CENTER, 0, 0);
toast.show();

The first parameter is used to set the gravity itself (there is a full set of those in Gravity class). Second and third parameters define by how many pixels, relative to the value set in the first parameter, should the Toast be offset.

Adding an Image to the Standard Toast

In order to add an image to the standard Toast, you first need to create an ImageView object, and set its image from the resources using the setImageResource method. You then need to get the standard view (which is actually a LinearLayout) and add the newly created ImageView object to it. The position, into which the image needs to be inserted, also should be set (in our case 0 is used, so that the image is displayed over the text). Code for this is shown below:

Toast toast = Toast.makeText(getApplicationContext(),
"Hello, The Code Project!", Toast.LENGTH_LONG);
toast.setGravity(Gravity.CENTER, 0, 0);
LinearLayout toastView = (LinearLayout) toast.getView();
ImageView imageCodeProject = new ImageView(getApplicationContext());
imageCodeProject.setImageResource(R.drawable.codeprojectlogo);
toastView.addView(imageCodeProject, 0);
toast.show();


Creating a Toast with Custom Layout

In order to create a Toast with custom layout, we first need to create that layout itself. Its code is shown below:

<?xml version="1.0" encoding="utf-8"?>
<LinearLayout
xmlns:android="http://schemas.android.com/apk/res/android"
android:layout_height="wrap_content" android:layout_width="wrap_content"
android:background="#ffffffff" android:orientation="vertical"
android:id="@+id/llToast" >
<TextView
android:layout_height="wrap_content"
android:layout_margin="1dip"
android:textColor="#ffffffff"
android:layout_width="fill_parent"
android:gravity="center"
android:background="#bb000000"
android:id="@+id/tvTitleToast" />
<LinearLayout
android:layout_height="wrap_content"
android:orientation="vertical"
android:id="@+id/llToastContent"
android:layout_marginLeft="1dip"
android:layout_marginRight="1dip"
android:layout_marginBottom="1dip"
android:layout_width="wrap_content"
android:padding="15dip"
android:background="#44000000" >
<ImageView
android:layout_height="wrap_content"
android:layout_gravity="center"
android:layout_width="wrap_content"
android:id="@+id/tvImageToast" />
<TextView
android:layout_height="wrap_content"
android:paddingRight="10dip"
android:paddingLeft="10dip"
android:layout_width="wrap_content"
android:gravity="center"
android:textColor="#ff000000"
android:id="@+id/tvTextToast" />
</LinearLayout>
</LinearLayout>

The Toast we created looks like a dialog with a header, an image and a message. We now need to set the layout that we created to the Toast. We should also set the dialog title, the message text and the image. This is how we do it:

LayoutInflater inflater = getLayoutInflater();
View layout = inflater.inflate(R.layout.customtoast,
(ViewGroup) findViewById(R.id.llToast));
ImageView image = (ImageView) layout.findViewById(R.id.tvImageToast);
image.setImageResource(R.drawable.codeprojectlogo);
TextView title = (TextView) layout.findViewById(R.id.tvTitleToast);
title.setText("Attention");
TextView text = (TextView) layout.findViewById(R.id.tvTextToast);
text.setText("Hello, The Code Project!");
Toast toast = new Toast(getApplicationContext());
toast.setGravity(Gravity.RIGHT | Gravity.TOP, 12, 40);
toast.setDuration(Toast.LENGTH_LONG);
toast.setView(layout);
toast.show();

The first two lines initialize the View object by inflating the layout from an XML file (we use an instance of LayoutInflater class, returned by getLayoutInflater, to do that). The first parameter to inflate method sets the id of the layout created earlier - R.layout.customtoast (it matches the res/layout/customtoast.xml file). We then get the references to the image, header title and message text, and fill them with the appropriate data. Finally, we create a Toast itself, set all the required parameters as well as the layout we created earlier

Calling a Toast from Another Thread

To call a Toast from another Thread, you need to define a property of Handler type in your class:

Handler handler = new Handler();

Now, let's assume that you have a Thread, in which you need to call a method that displays a Toast:

new Thread(new Runnable() {
public void run() {
showToast();
}
}).start();

In this case, the method will be executed in a separate Thread. But because a Toast can only be displayed in the main Thread, you will get an error when you try to run this.

If you need to execute in the main Thread, when calling from a separate Thread, you need a Handler, that was defined earlier. You can display a Toast from newly created Thread in this way:
Collapse

public void showToast() {
handler.post(new Runnable() {
public void run() {
Toast.makeText(getApplicationContext(),
"Hello, The Code Project!", Toast.LENGTH_SHORT).show();
}
});
}

GPSLocator - App to Find Current (Nearest) Location using GPS

One of the most fascinating features provided by a phone is GPS functionality (at least for me it is). I never realized that interacting with GPS functionality is so easy until I worked with it. This article is a way to help people realize the same. This article is targeted to a beginner who wants to implement GPS functionality and work with Google Maps API as well.
In this article, we will create a very simple application called GPSLocator. GPSLocator gets the Latitude and Longitude information from GPS and displays the exact (or nearest, at times) location in Google Maps.
Prerequisite
For developing GPSLocator, we need the following applications pre-installed:
Apart from the above two things, we also require:
One Step at a Time
Explaining an application, specially developing an application is a complex task. We will try to break it down into multiple steps to make it easy to swallow. We will try to complete one step at a time and move towards our final application. So, let's get started.
Google Maps API key and KeyStore File
The first and foremost thing is getting a Google Maps API key. Getting one is relatively easy but it requires our application to be signed with a certificate and notify Google about Hash (MD5) fingerprint of the certificate. Now, the process can be further divided into two parts:
  • Creating a certificate and getting its MD5 fingerprint
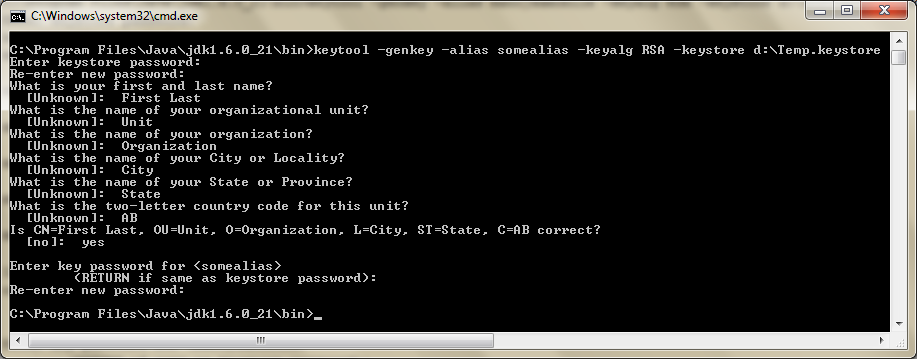
We can create a new certificate by using keytool.exe, found in bin directory of JDK installation path (something like C:\Program Files\Java\jdk1.6.0_21\bin). We need to pass some information and it will generate a keystore file (Public Key Storage Certificate File). One sample output is:
For developing and testing application, we usually sign the application in Debug mode. For this, we need to sign-up for Google Maps API with the debug certificate MD5 hash. The certificate used for this purpose is debug.keystore. It is usually located in:
Collapse
%userprofile%/.android/
For finding the MD5 of a certificate, we run the command:
Collapse
keytool -list -alias androiddebugkey -keystore debug.keystore
-storepass android -keypass android
The output of the command looks like:
  • Signing up for Google Maps API
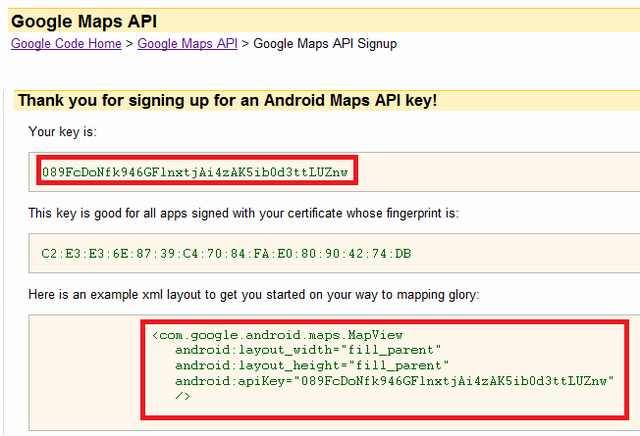
Go to Maps API Key signup page and pass on MD5 key (highlighted above) and we get a Maps API key. The page also shows how to use API key in a MapView.
For more details about getting Google Maps API key, check Obtaining a Maps API Key.
Create New Android Project
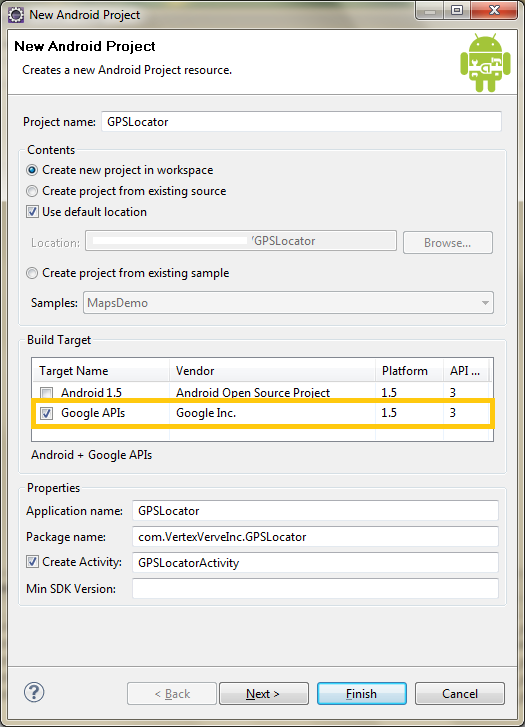
Create a new Android Project and provide the details as below. Also, make sure to select Build Target as Google APIs.
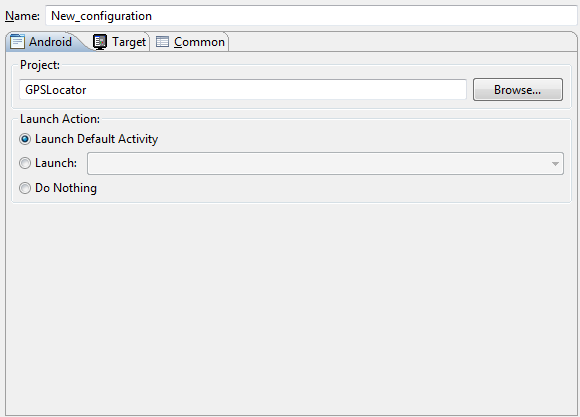
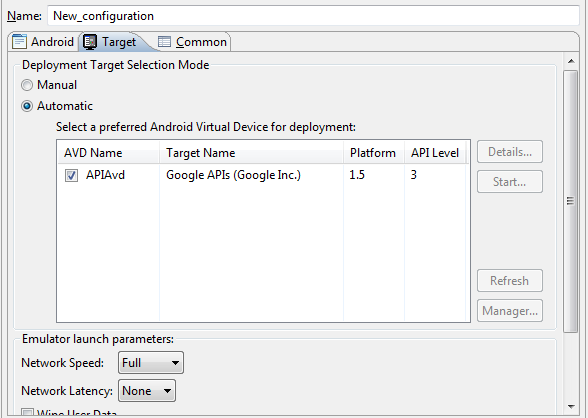
Click Finish and the project is created. Create a Run Configuration for the project to launch an AVD targeted to Google APIs (Check Prerequisite section). Also, make sure that version of Google APIs selected for AVD and Build Target is same. Some screenshots of the configuration are:
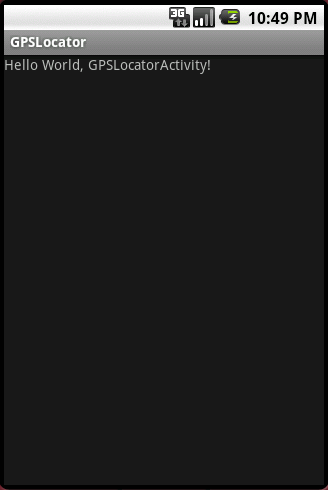
Try running the project with the specified configuration and it should show something like:
Add Google Map and Permissions
Before we can start using MapView control from Google APIs, we need to add the Google Maps External Library (com.google.android.map) to the library. For adding a library to the project use uses-library tag. This tag needs to be added to AndroidManifest.xml. Apart from the library, we need to add relevant permissions as well. For adding permissions, we use uses-permission tag. For our application, we will add the following permissions:
  • android.permission.ACCESS_COARSE_LOCATION: Allows application to access coarse location (Cell ID, Wi-Fi etc.)
  • android.permission.ACCESS_FINE_LOCATION: Allows application to access GPS location.
  • android.permission.INTERNET: Allows application to open network sockets.
For more information about permissions, check Permissions.
The final AndroidManifest.xml should look like:
Collapse
<?xml version="1.0" encoding="utf-8"?>
<manifest xmlns:android="http://schemas.android.com/apk/res/android"
    package="com.VertexVerveInc.GPSLocator"
    android:versionCode="1"
    android:versionName="1.0">
 
  <uses-permission android:name="android.permission.ACCESS_COARSE_LOCATION" />
  <uses-permission android:name="android.permission.ACCESS_FINE_LOCATION" /> 
  <uses-permission android:name="android.permission.INTERNET" />
 
  <application android:icon="@drawable/icon" android:label="@string/app_name">
    <uses-library android:name="com.google.android.maps" />
    <activity android:name=".GPSLocatorActivity"
          android:label="@string/app_name">
      <intent-filter>
        <action android:name="android.intent.action.MAIN" />
        <category android:name="android.intent.category.LAUNCHER" />
      </intent-filter>
    </activity>
  </application>
</manifest>
Finally, add MapView control to main.xml under res/layout. The resultant code should look like:
Collapse
<?xml version="1.0" encoding="utf-8"?>
<LinearLayout xmlns:android="http://schemas.android.com/apk/res/android"
  android:orientation="vertical"
  android:layout_width="fill_parent"
  android:layout_height="fill_parent"
  >
  <com.google.android.maps.MapView
    android:id="@+id/mapView"
    android:layout_width="fill_parent"
    android:layout_height="fill_parent"
    android:enabled="true"
    android:clickable="true"
    android:apiKey="089FcDoNfk946GFlnxtjAi4zAK5ib0d3ttLUZnv"
    />
</LinearLayout>
Show the Bare Minimum Google Map
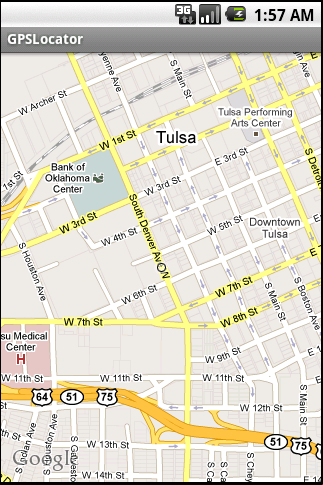
In order to display Google Map view, we need to update our Activity class (GPSLocatorActivity). This class should extend MapActivity class in place of Activity class. We also need to import com.google.android.maps.MapActivity package to support MapActivity class. We also need to override isRouteDisplayed method of MapActivity class. This is fairly easy, just return false from the method. After all these modifications, GPSLocatorActivity.java should look like:
Collapse
package com.VertexVerveInc.GPSLocator;
 
import com.google.android.maps.MapActivity;
import android.os.Bundle;
 
public class GPSLocatorActivity extends MapActivity
{
 
  @Override
  public void onCreate(Bundle savedInstanceState) {
    super.onCreate(savedInstanceState);
    setContentView(R.layout.main);
  }
 
  @Override
  protected boolean isRouteDisplayed() {
    return false;
  }
}
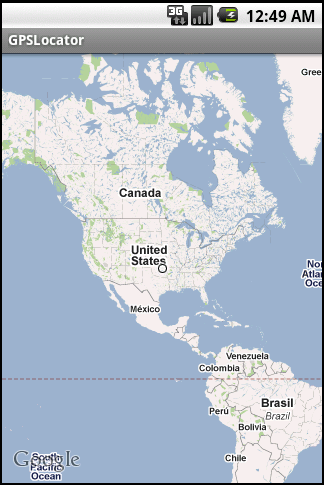
Try running the application at this stage and it should show Google Map in the Emulator.
Add Zoom (in/out) Controls
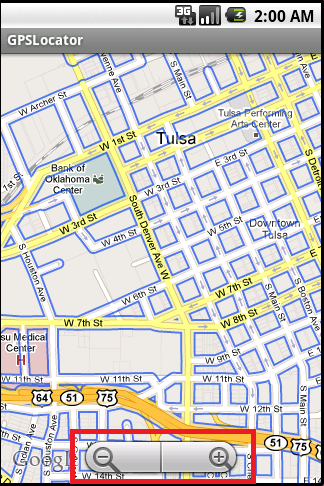
MapView class has an in-built method setBuiltInZoomControls. Invoking this method with true/false enable/disables Zoom in/out controls. In order to invoke this method, we need to find the instance of MapView class by calling findViewById with id of MapView control. Remember id="@+id/mapView" from the main.xml. One important thing to note here is that the zoom controls will become enable once we will touch/click the map view.
Change Map view and Zoom level
We can select, if we want to show Satellite, Traffic or Street view in maps. This is simply achieved by calling setSatellite, setStreetView and setTraffic methods. Another thing to do before we move further is zoom the map a bit. Why? Because the map view shown in the above output doesn't serve any purpose. In order to set zoom level of Map, we need an instance of MapController and we can call its setZoom method. So, let's update the onCreate method of GPSLocatorActivity class to incorporate all these changes.
Collapse
import com.google.android.maps.MapView;
import com.google.android.maps.MapController;
 
private MapView mapView;
private MapController mapController;
 
@Override
public void onCreate(Bundle savedInstanceState) {
  super.onCreate(savedInstanceState);
  setContentView(R.layout.main);
 
  mapView = (MapView) findViewById(R.id.mapView);
 
  // enable Street view by default
  mapView.setStreetView(true);
 
  // enable to show Satellite view
  // mapView.setSatellite(true);
 
  // enable to show Traffic on map
  // mapView.setTraffic(true);
 
  mapView.setBuiltInZoomControls(true);
 
  mapController = mapView.getController();
  mapController.setZoom(16);
}
Running the application at current stage produces the following output:
Add GPS Location Mapping
Android provides location based services through LocationManager (package android.Location) class. This class provides periodical updates about the location of the device. In order to user LocationManager, we need to get a reference of LocationManager class by calling getSystemService method. Later on, we need to register for location updates by calling requestLocationUpdates method.
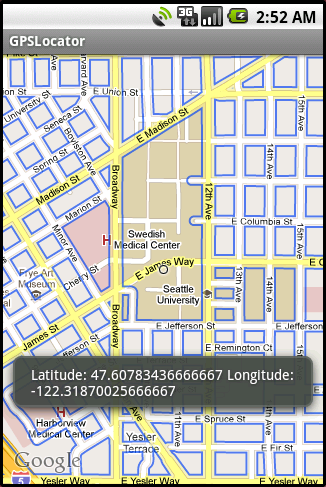
We need to create a class implementing abstract LocationListener class. This class will be registered with Location Manager to receive updates of location. We need to override all four methods of this class, namely onLocationChanged, onProviderDisabled/Enabled, and onStatusChanged. As we are just interested in getting location updates, we will modify the code of onLocationChanged to navigate to the new location received in the map view. This is achieved by calling animateTo method of MapController.
Let's add the bits of code to our project.
Collapse
import com.google.android.maps.GeoPoint;
import android.content.Context;
import android.location.Location;
import android.location.LocationListener;
import android.location.LocationManager;
 
private LocationManager locationManager;
private LocationListener locationListener;
 
@Override
public void onCreate(Bundle savedInstanceState) {
  ...
 
  locationManager = (LocationManager) getSystemService(Context.LOCATION_SERVICE); 
 
  locationListener = new GPSLocationListener();
 
  locationManager.requestLocationUpdates(
    LocationManager.GPS_PROVIDER,
    0,
    0,
    locationListener);
 
  ...
}
 
private class GPSLocationListener implements LocationListener
{
  @Override
  public void onLocationChanged(Location location) {
    if (location != null) {
      GeoPoint point = new GeoPoint(
          (int) (location.getLatitude() * 1E6),
          (int) (location.getLongitude() * 1E6));
 
      Toast.makeText(getBaseContext(),
          "Latitude: " + location.getLatitude() +
          " Longitude: " + location.getLongitude(),
          Toast.LENGTH_SHORT).show();
 
      mapController.animateTo(point);
      mapController.setZoom(16);
      mapView.invalidate();
    }
  }
 
  ...
}
On running the application, we see a message displaying information about the GPS location. We can skip to the Testing GPS functionality section to get this working. For more information about working with location, check Obtaining User Location.
Find Address for GPS Location
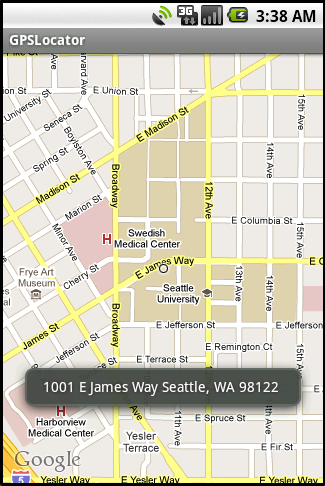
We can find information about an address if we know its latitude and longitude. For this purpose, we use Geocoder class and the process is known as Geocoding. We will call getFromLocation method of the class and will pass the point as a parameter. This method returns a List of Address which contains information about address of the specified location. We can combine the information to find the complete information about the point. For this purpose, we will add a method ConvertPointToLocation to GPSLocationListener class. ConvertPointToLocation returns a string object containing address of the location.
Collapse
import android.location.Geocoder;
import android.location.Address;
 
private class GPSLocationListener implements LocationListener {
  @Override
  public void onLocationChanged(Location location) {
    if (location != null) {
      ...
      String address = ConvertPointToLocation(point);
      Toast.makeText(getBaseContext(), address, Toast.LENGTH_SHORT).show();
      ...
    }
  }
 
  public String ConvertPointToLocation(GeoPoint point) {  
    String address = "";
    Geocoder geoCoder = new Geocoder(
        getBaseContext(), Locale.getDefault());
    try {
      List<Address> addresses = geoCoder.getFromLocation(
        point.getLatitudeE6()  / 1E6,
        point.getLongitudeE6() / 1E6, 1);
 
      if (addresses.size() > 0) {
        for (int index = 0;
        index < addresses.get(0).getMaxAddressLineIndex(); index++)
          address += addresses.get(0).getAddressLine(index) + " ";
      }
    }
    catch (IOException e) {       
      e.printStackTrace();
    }  
 
    return address;
  }
  ...
Running the application shows an address on the map in place of longitude and latitude values.
Add a Location Marker
A lot many times, we want to add a marker (image) to the location because the small circle (shown in maps by default) is sometimes useless. In order to add a marker, add a drawable resource to the project. We can import any image (which we want to use) to our project (simple drag and drop also works). Add the image to res/drawable folder.
In order to add a location marker to the map, we need to create a class which extends Overlay (com.google.android.maps package) class. We need to override draw method of the class and do some custom painting. The MapOverlay class looks like:
Collapse
import com.google.android.maps.Overlay;
import android.graphics.Canvas;
import android.graphics.Point;
import android.graphics.Bitmap;
import android.graphics.BitmapFactory;
 
private class GPSLocationListener implements LocationListener
{
  @Override
  public void onLocationChanged(Location location) {
    ...
 
      mapController.animateTo(point);
      mapController.setZoom(16);
 
      // add marker
      MapOverlay mapOverlay = new MapOverlay();
      mapOverlay.setPointToDraw(point);
      List<Overlay> listOfOverlays = mapView.getOverlays();
      listOfOverlays.clear();
      listOfOverlays.add(mapOverlay);
 
      String address = ConvertPointToLocation(point);
      Toast.makeText(getBaseContext(), address, Toast.LENGTH_SHORT).show();
 
      ...
}
 
class MapOverlay extends Overlay
{
  private GeoPoint pointToDraw;
 
  public void setPointToDraw(GeoPoint point) {
    pointToDraw = point;
  }
 
  public GeoPoint getPointToDraw() {
    return pointToDraw;
  }
 
  @Override
  public boolean draw(Canvas canvas, MapView mapView, boolean shadow, long when) {
    super.draw(canvas, mapView, shadow);          
 
    // convert point to pixels
    Point screenPts = new Point();
    mapView.getProjection().toPixels(pointToDraw, screenPts);
 
    // add marker
    Bitmap bmp = BitmapFactory.decodeResource(getResources(), R.drawable.red);
    canvas.drawBitmap(bmp, screenPts.x, screenPts.y - 24, null);   
    return true;
  }
}
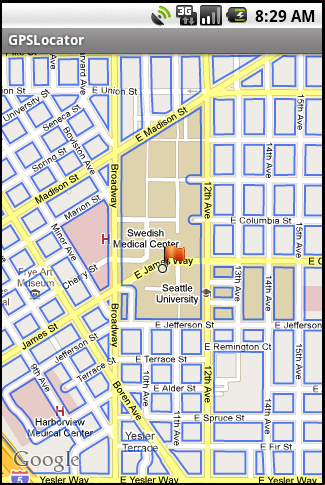
Yes, let's run this application and as expected it should show a marker at the current GPS location.
Testing GPS Functionality
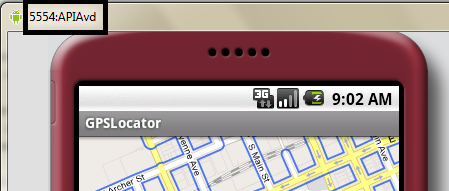
How can we test GPS functionality when we don't have any GPS in our computer? Well, this is really tricky but Developers at Google already thought about this problem. By this I mean, Yes, we have a way to interact with GPS on the emulator. We can simulate GPS location change in emulator. We can control and query the running instance of emulator with console (telnet). On a command prompt enter "telnet localhost <port>" command to connect to the console. Port number is usually displayed in the title bar of the emulator. For example, for me it is: 5554.
We can change the GPS location by sending geo fix command. We need to pass longitude and latitude values along with it. For example, in order to change our current location to Seattle (longitude: -122.332071, latitude: 47.60621), we send 'geo fix -122.332071 47.60621' from the console. For more information about communicating with console, check Android Emulator.
Summary
Working with GPS and Google Maps API both is easy, entertaining and creative as well. GPSLocator is my first attempt to make my fellow developers aware of the same fact. Please provide your feedback and suggestions. Do I need to mention that you can rate my article as well, if you liked it.