One of the most fascinating features provided by a phone is GPS functionality (at least for me it is). I never realized that interacting with GPS functionality is so easy until I worked with it. This article is a way to help people realize the same. This article is targeted to a beginner who wants to implement GPS functionality and work with Google Maps API as well.
In this article, we will create a very simple application called GPSLocator. GPSLocator gets the Latitude and Longitude information from GPS and displays the exact (or nearest, at times) location in Google Maps.
Prerequisite
For developing GPSLocator, we need the following applications pre-installed:
Apart from the above two things, we also require:
One Step at a Time
Explaining an application, specially developing an application is a complex task. We will try to break it down into multiple steps to make it easy to swallow. We will try to complete one step at a time and move towards our final application. So, let's get started.
Google Maps API key and KeyStore File
The first and foremost thing is getting a Google Maps API key. Getting one is relatively easy but it requires our application to be signed with a certificate and notify Google about Hash (MD5) fingerprint of the certificate. Now, the process can be further divided into two parts:
- Creating a certificate and getting its MD5 fingerprint
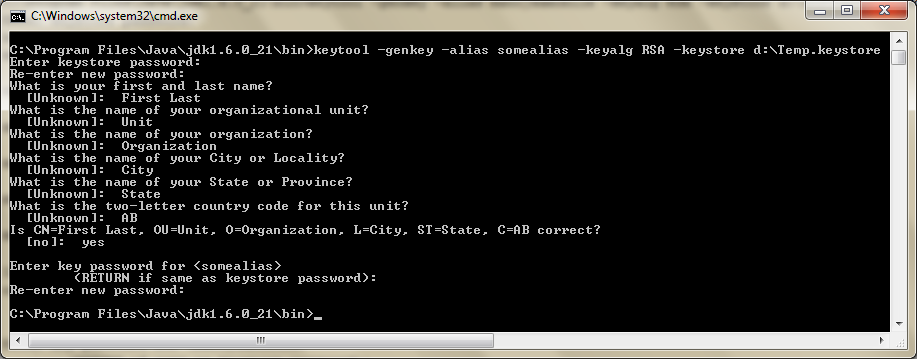
We can create a new certificate by using keytool.exe, found in bin directory of JDK installation path (something like C:\Program Files\Java\jdk1.6.0_21\bin). We need to pass some information and it will generate a keystore file (Public Key Storage Certificate File). One sample output is:
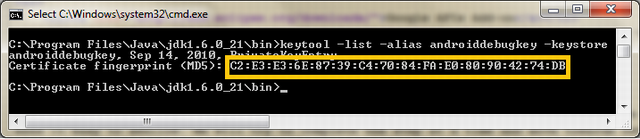
For developing and testing application, we usually sign the application in Debug mode. For this, we need to sign-up for Google Maps API with the debug certificate MD5 hash. The certificate used for this purpose is debug.keystore. It is usually located in:
%userprofile%/.android/
For finding the MD5 of a certificate, we run the command:
keytool -list -alias androiddebugkey -keystore debug.keystore
-storepass android -keypass android
The output of the command looks like:
- Signing up for Google Maps API
Go to Maps API Key signup page and pass on MD5 key (highlighted above) and we get a Maps API key. The page also shows how to use API key in a MapView.
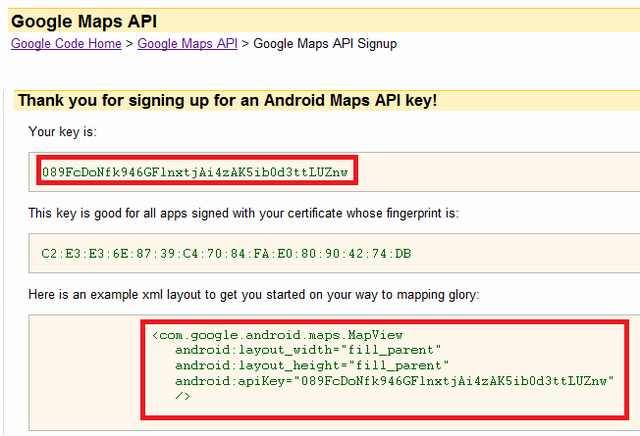
For more details about getting Google Maps API key, check Obtaining a Maps API Key.
Create New Android Project
Create a new Android Project and provide the details as below. Also, make sure to select Build Target as Google APIs.
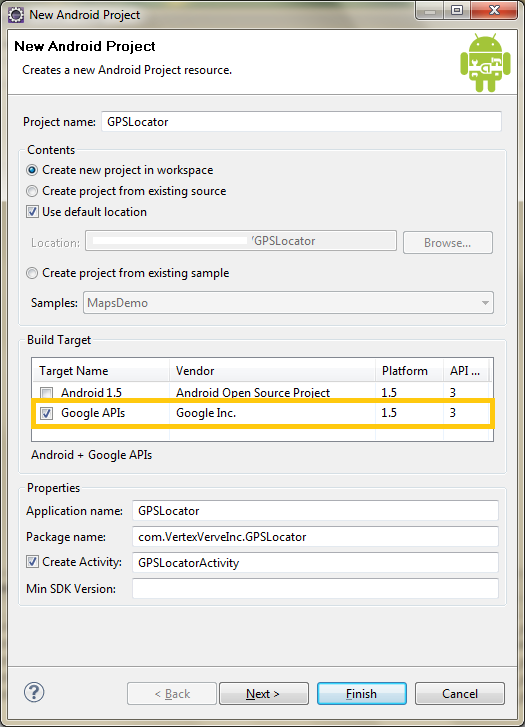
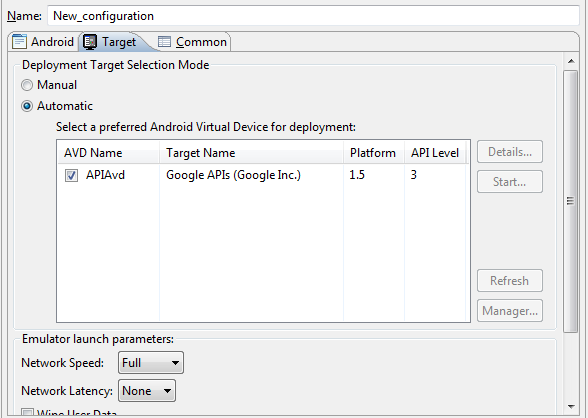
Click Finish and the project is created. Create a Run Configuration for the project to launch an AVD targeted to Google APIs (Check Prerequisite section). Also, make sure that version of Google APIs selected for AVD and Build Target is same. Some screenshots of the configuration are:

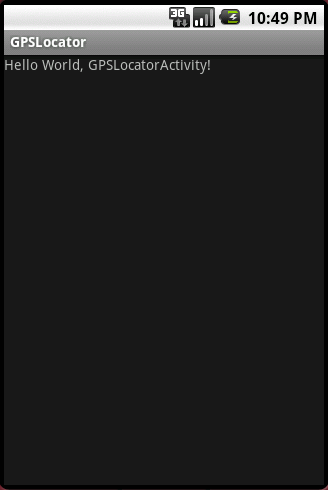
Try running the project with the specified configuration and it should show something like:
Add Google Map and Permissions
Before we can start using MapView control from Google APIs, we need to add the Google Maps External Library (com.google.android.map) to the library. For adding a library to the project use uses-library tag. This tag needs to be added to AndroidManifest.xml. Apart from the library, we need to add relevant permissions as well. For adding permissions, we use uses-permission tag. For our application, we will add the following permissions:
- android.permission.ACCESS_COARSE_LOCATION: Allows application to access coarse location (Cell ID, Wi-Fi etc.)
- android.permission.ACCESS_FINE_LOCATION: Allows application to access GPS location.
- android.permission.INTERNET: Allows application to open network sockets.
For more information about permissions, check Permissions.
The final AndroidManifest.xml should look like:
<?xml version="1.0" encoding="utf-8"?>
<manifest xmlns:android="http://schemas.android.com/apk/res/android"
package="com.VertexVerveInc.GPSLocator"
android:versionCode="1"
android:versionName="1.0">
<uses-permission android:name="android.permission.ACCESS_COARSE_LOCATION" />
<uses-permission android:name="android.permission.ACCESS_FINE_LOCATION" />
<uses-permission android:name="android.permission.INTERNET" />
<application android:icon="@drawable/icon" android:label="@string/app_name">
<uses-library android:name="com.google.android.maps" />
<activity android:name=".GPSLocatorActivity"
android:label="@string/app_name">
<intent-filter>
<action android:name="android.intent.action.MAIN" />
<category android:name="android.intent.category.LAUNCHER" />
</intent-filter>
</activity>
</application>
</manifest>
Finally, add MapView control to main.xml under res/layout. The resultant code should look like:
<?xml version="1.0" encoding="utf-8"?>
<LinearLayout xmlns:android="http://schemas.android.com/apk/res/android"
android:orientation="vertical"
android:layout_width="fill_parent"
android:layout_height="fill_parent"
>
<com.google.android.maps.MapView
android:id="@+id/mapView"
android:layout_width="fill_parent"
android:layout_height="fill_parent"
android:enabled="true"
android:clickable="true"
android:apiKey="089FcDoNfk946GFlnxtjAi4zAK5ib0d3ttLUZnv"
/>
</LinearLayout>
Show the Bare Minimum Google Map
In order to display Google Map view, we need to update our Activity class (GPSLocatorActivity). This class should extend MapActivity class in place of Activity class. We also need to import com.google.android.maps.MapActivity package to support MapActivity class. We also need to override isRouteDisplayed method of MapActivity class. This is fairly easy, just return false from the method. After all these modifications, GPSLocatorActivity.java should look like:
package com.VertexVerveInc.GPSLocator;
import com.google.android.maps.MapActivity;
import android.os.Bundle;
public class GPSLocatorActivity extends MapActivity
{
@Override
public void onCreate(Bundle savedInstanceState) {
super.onCreate(savedInstanceState);
setContentView(R.layout.main);
}
@Override
protected boolean isRouteDisplayed() {
return false;
}
}
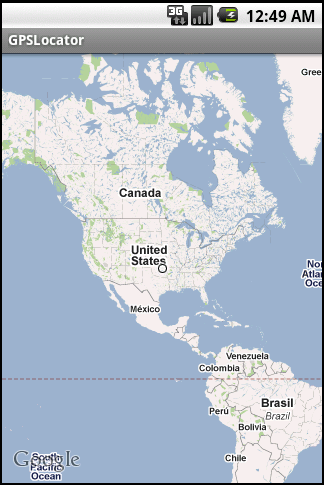
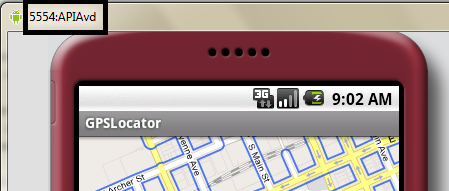
Try running the application at this stage and it should show Google Map in the Emulator.
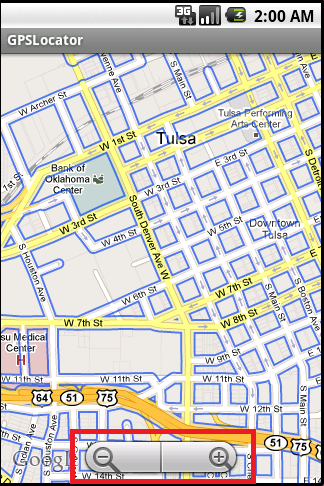
Add Zoom (in/out) Controls
MapView class has an in-built method setBuiltInZoomControls. Invoking this method with true/false enable/disables Zoom in/out controls. In order to invoke this method, we need to find the instance of MapView class by calling findViewById with id of MapView control. Remember id="@+id/mapView" from the main.xml. One important thing to note here is that the zoom controls will become enable once we will touch/click the map view.
Change Map view and Zoom level
We can select, if we want to show Satellite, Traffic or Street view in maps. This is simply achieved by calling setSatellite, setStreetView and setTraffic methods. Another thing to do before we move further is zoom the map a bit. Why? Because the map view shown in the above output doesn't serve any purpose. In order to set zoom level of Map, we need an instance of MapController and we can call its setZoom method. So, let's update the onCreate method of GPSLocatorActivity class to incorporate all these changes.
import com.google.android.maps.MapView;
import com.google.android.maps.MapController;
private MapView mapView;
private MapController mapController;
@Override
public void onCreate(Bundle savedInstanceState) {
super.onCreate(savedInstanceState);
setContentView(R.layout.main);
mapView = (MapView) findViewById(R.id.mapView);
// enable Street view by default
mapView.setStreetView(true);
// enable to show Satellite view
// mapView.setSatellite(true);
// enable to show Traffic on map
// mapView.setTraffic(true);
mapView.setBuiltInZoomControls(true);
mapController = mapView.getController();
mapController.setZoom(16);
}
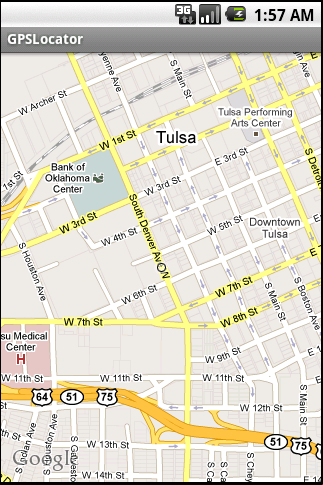
Running the application at current stage produces the following output:
Add GPS Location Mapping
Android provides location based services through LocationManager (package android.Location) class. This class provides periodical updates about the location of the device. In order to user LocationManager, we need to get a reference of LocationManager class by calling getSystemService method. Later on, we need to register for location updates by calling requestLocationUpdates method.
We need to create a class implementing abstract LocationListener class. This class will be registered with Location Manager to receive updates of location. We need to override all four methods of this class, namely onLocationChanged, onProviderDisabled/Enabled, and onStatusChanged. As we are just interested in getting location updates, we will modify the code of onLocationChanged to navigate to the new location received in the map view. This is achieved by calling animateTo method of MapController.
Let's add the bits of code to our project.
import com.google.android.maps.GeoPoint;
import android.content.Context;
import android.location.Location;
import android.location.LocationListener;
import android.location.LocationManager;
private LocationManager locationManager;
private LocationListener locationListener;
@Override
public void onCreate(Bundle savedInstanceState) {
...
locationManager = (LocationManager) getSystemService(Context.LOCATION_SERVICE);
locationListener = new GPSLocationListener();
locationManager.requestLocationUpdates(
LocationManager.GPS_PROVIDER,
0,
0,
locationListener);
...
}
private class GPSLocationListener implements LocationListener
{
@Override
public void onLocationChanged(Location location) {
if (location != null) {
GeoPoint point = new GeoPoint(
(int) (location.getLatitude() * 1E6),
(int) (location.getLongitude() * 1E6));
Toast.makeText(getBaseContext(),
"Latitude: " + location.getLatitude() +
" Longitude: " + location.getLongitude(),
Toast.LENGTH_SHORT).show();
mapController.animateTo(point);
mapController.setZoom(16);
mapView.invalidate();
}
}
...
}
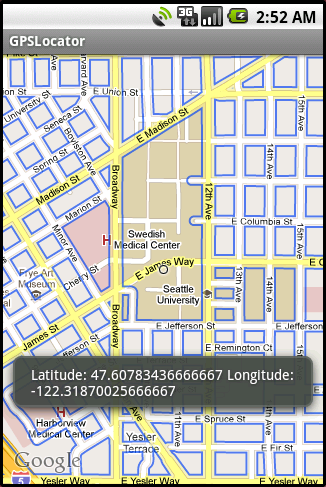
On running the application, we see a message displaying information about the GPS location. We can skip to the Testing GPS functionality section to get this working. For more information about working with location, check Obtaining User Location.
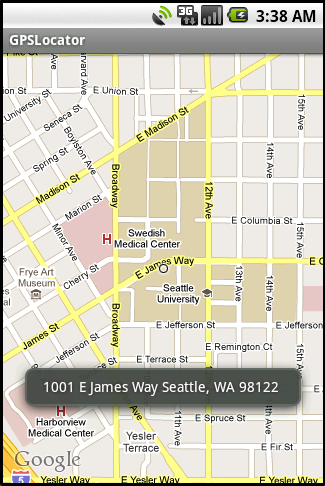
Find Address for GPS Location
We can find information about an address if we know its latitude and longitude. For this purpose, we use Geocoder class and the process is known as Geocoding. We will call getFromLocation method of the class and will pass the point as a parameter. This method returns a List of Address which contains information about address of the specified location. We can combine the information to find the complete information about the point. For this purpose, we will add a method ConvertPointToLocation to GPSLocationListener class. ConvertPointToLocation returns a string object containing address of the location.
import android.location.Geocoder;
import android.location.Address;
private class GPSLocationListener implements LocationListener {
@Override
public void onLocationChanged(Location location) {
if (location != null) {
...
String address = ConvertPointToLocation(point);
Toast.makeText(getBaseContext(), address, Toast.LENGTH_SHORT).show();
...
}
}
public String ConvertPointToLocation(GeoPoint point) {
String address = "";
Geocoder geoCoder = new Geocoder(
getBaseContext(), Locale.getDefault());
try {
List<Address> addresses = geoCoder.getFromLocation(
point.getLatitudeE6() / 1E6,
point.getLongitudeE6() / 1E6, 1);
if (addresses.size() > 0) {
for (int index = 0;
index < addresses.get(0).getMaxAddressLineIndex(); index++)
address += addresses.get(0).getAddressLine(index) + " ";
}
}
catch (IOException e) {
e.printStackTrace();
}
return address;
}
...
Running the application shows an address on the map in place of longitude and latitude values.
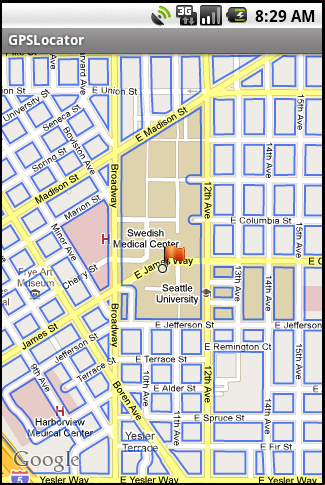
Add a Location Marker
A lot many times, we want to add a marker (image) to the location because the small circle (shown in maps by default) is sometimes useless. In order to add a marker, add a drawable resource to the project. We can import any image (which we want to use) to our project (simple drag and drop also works). Add the image to res/drawable folder.
In order to add a location marker to the map, we need to create a class which extends Overlay (com.google.android.maps package) class. We need to override draw method of the class and do some custom painting. The MapOverlay class looks like:
import com.google.android.maps.Overlay;
import android.graphics.Canvas;
import android.graphics.Point;
import android.graphics.Bitmap;
import android.graphics.BitmapFactory;
private class GPSLocationListener implements LocationListener
{
@Override
public void onLocationChanged(Location location) {
...
mapController.animateTo(point);
mapController.setZoom(16);
// add marker
MapOverlay mapOverlay = new MapOverlay();
mapOverlay.setPointToDraw(point);
List<Overlay> listOfOverlays = mapView.getOverlays();
listOfOverlays.clear();
listOfOverlays.add(mapOverlay);
String address = ConvertPointToLocation(point);
Toast.makeText(getBaseContext(), address, Toast.LENGTH_SHORT).show();
...
}
class MapOverlay extends Overlay
{
private GeoPoint pointToDraw;
public void setPointToDraw(GeoPoint point) {
pointToDraw = point;
}
public GeoPoint getPointToDraw() {
return pointToDraw;
}
@Override
public boolean draw(Canvas canvas, MapView mapView, boolean shadow, long when) {
super.draw(canvas, mapView, shadow);
// convert point to pixels
Point screenPts = new Point();
mapView.getProjection().toPixels(pointToDraw, screenPts);
// add marker
Bitmap bmp = BitmapFactory.decodeResource(getResources(), R.drawable.red);
canvas.drawBitmap(bmp, screenPts.x, screenPts.y - 24, null);
return true;
}
}
Yes, let's run this application and as expected it should show a marker at the current GPS location.
Testing GPS Functionality
How can we test GPS functionality when we don't have any GPS in our computer? Well, this is really tricky but Developers at Google already thought about this problem. By this I mean, Yes, we have a way to interact with GPS on the emulator. We can simulate GPS location change in emulator. We can control and query the running instance of emulator with console (telnet). On a command prompt enter "telnet localhost <port>" command to connect to the console. Port number is usually displayed in the title bar of the emulator. For example, for me it is: 5554.
We can change the GPS location by sending geo fix command. We need to pass longitude and latitude values along with it. For example, in order to change our current location to Seattle (longitude: -122.332071, latitude: 47.60621), we send 'geo fix -122.332071 47.60621' from the console. For more information about communicating with console, check Android Emulator.
Summary
Working with GPS and Google Maps API both is easy, entertaining and creative as well. GPSLocator is my first attempt to make my fellow developers aware of the same fact. Please provide your feedback and suggestions. Do I need to mention that you can rate my article as well, if you liked it.
0 件のコメント:
コメントを投稿